1.0 Introduction
Astrophotography can be a rewarding hobby, but at the same time can be frustrating. The frustration comes from trying to get those near perfect celestial photographs without getting the annoyance of star streaks know as field rotation. There are a variety of methodologies for avoiding field rotations, namely using German equatorial mounted scopes or wedges attached to fork mounted scopes. Fork mounted scopes are also known as altitude-azimuth (altaz) mounted telescopes. One method that has been essentially neglected and in some cases even rejected by many amateur astronomers today is the use of a de-rotator on fork mounted telescopes. Much controversy has emanated from the ranks of amateurs that have discredited the use of de-rotators at an amateur level, elevating the use of bulky wedges and tedious polar alignment methods. One must remember that field de-rotation is in fact used by today’s largest telescopes, which universally employ altaz mounts.
A de-rotator by itself is not sufficient for field-free rotational deep sky photographs. Enhancements to deep sky photography also require either off-axis tracking or a separate piggy-back mounted guider scope. The intention of this article is not to discredit the most popular and possibly the most utilized method for photographic alignment, namely polar, but rather to present a case for de-rotations as a viable option to the amateur for taking photographs of the heavens at long exposures (great than 5 minutes).
2.0 Addressing the Main Pros and Cons of Field De-rotators
Whether polar alignment is more accurate than altaz using a de-rotator remains to be seen. One of the advantages of polar alignment is that it first allows for less correction during guiding, especially along the declination. Polar alignment also permits piggyback photography and permits use of PEC or Smartdrive on a scope for more accurate tracking. As a result, the GOTO performance in polar alignment can be very precise. But this is not without its drawbacks. To get to polar alignment, one must use a wedge which is heavy and harder to transport unless you have a permanently fixed mount. The flexure between the tripod and the scope is accentuated and sensitivity to vibration and wind can be a big problem.
The addition of a de-rotator gives the altaz mount a accuracy comparable to polar alignment scopes. The field de-rotator in its self is light weight and very transportable, easy to setup in the field, and most important, does not need to go through the lengthy process of polar alignment. On the other hand, de-rotators are not without its problems: the de-rotator adds weight to the visual back of the scope, making the GOTO aspect of a scope suffer in precision, the extension to the visual back may cause the scope not to clear the fork (some 20% of the sky is lost), the visual back extension may cause increase vignetting,and a guidescope, PEC or Smartdrive cannot be used.
We can, off course, make compensations for these de-rotator short comings.
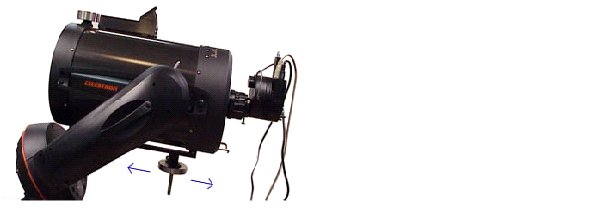
1. To compensate for the de-rotator’s weight on the back of the telescope, just add a counterbalance system to the scope as shown in figures 1a and 1b.
The balancing is accomplished by sliding the weight system up and down the SCT and also moving the set of weights along the little rod they are attached to on both axis as show in figures 1a and 1b, performing the vertical balance first then the horizontal balance last. Once balancing in both axes is achieved, you should be able to completely disengage the SCT and be able to rotate the SCT freely up and down without it pivoting straight down on its own (in other words, it should statically remain in any position without moving). This of course, reduces the stress on the tracking gears and makes for more accurate pointing and tracking.(Details can be seen at http://starizona.com/acb/basics/using_balancing_fork.aspx).

Counter Balance Figure (courtesy of Starizona)
Figure 1a Figure 1b

In terms of the extended Visual back that may cause the scope to not clear the fork, it is true that the upper 20% of the sky is lost, which some consider the most interesting portion; but remember, the earth rotates, so eventually a good portion of the upper 20% of the sky will eventually make its way into the allowable view of the scope as long as darkness presides.
1. As for the visual back extension causing increase vignette, I’ve never seen this with the extensions I have used, although it does become more apparent when one uses focal reducers (whether extensions are used or not).
2. On the issue that a guide scope and PEC cannot be used, differential flexure (sagging, flexing, and shifting of the guide scope in its rings) is a problem with guide scopes, so I basically stay away from guide scopes whether I used a der-rotator or not. An off-axis guider (OAG) is my preferred method simply because there is more stability and accuracy in tracking. The Tracker III from Taurus (a combination of a flip mirror, focuser, and off-axis guider) is my preferred OAG simply because the off-axis guider has a substantially large mirror and allows you to rotate the OAG 360 degrees, allowing one to have more of a selected area of the sky to pick guide stars from. And as for the inability in using PEC, I do not see that as problematic as some people let on. The purpose of the Precision Error Correction (PEC) is to correct for mechanical irregularities in the RA motion of the telescope caused by imperfections in the drive. PEC is not needed since it is important in Polar Alignment. PEC allows longer unguided exposures. With guiding, PEC is usually not necessary since corrections are being made almost constantly. Off axis guiding compensates for any periodic error that may occur when using a fork-mounted scope in conjunction with a de-rotator. As will be shown shortly, the images that were taken with the Meade de-rotator was done without PEC.
Other cons may exist for using a de-rotator, but the ones discussed in this article are what I believe are the major drawbacks that keep one from using a de-rotator and going to a wedge and polar alignment.
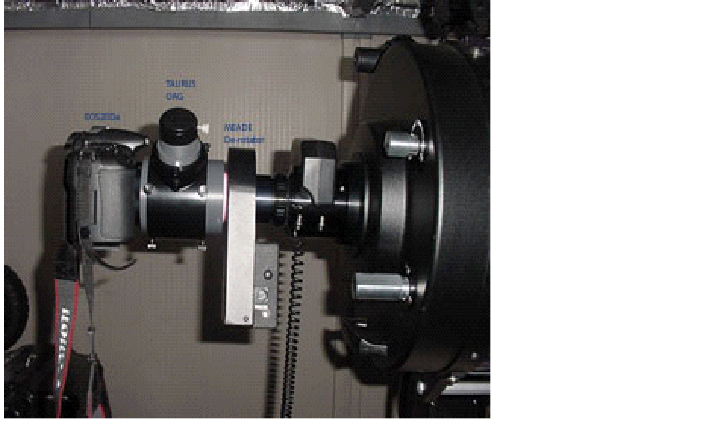
Figure 2 depicts the visual back setup. It includes a Canon EOS20Da DSLR as the main camera, Taurus Tracker III as the OAG, the Meade De-Rotator, and the LX200GPS electric focuser. Not shown is the counterbalance system needed to stabilize the tracking. The off-axis guiding is performed by my DSI Pro II (not shown). I’ve tried the LPI and the original DSI, but found that they were not sensitive enough for capturing guide stars. I used AutoStarSuite as my tracking software, which is excellent and very economical way if you have a Meade telescope as I do.
4.0 A picture is worth a thousand stars
In showing the accuracy of the Meade De-rotator, I took a series of 9 shots at various time intervals with increasing time exposures of the Orion nebula, as shown in Figure 3. Now, if one were to place this in a film strip and run the pictures, all the photographs would align with no noticeable offsets. Without the de-rotator, one would observe Orion Nebula rotating around an axis, which is not the case here at all.


With the aid of tracking, the de-rotator is apparently performing its job quite well.
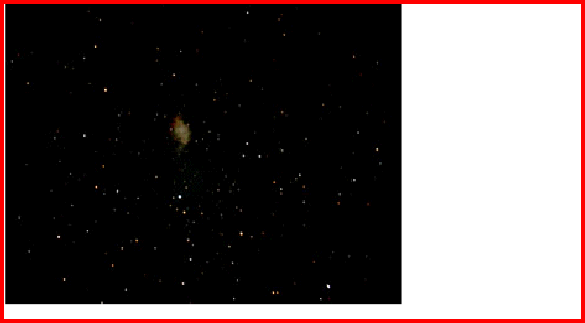
Now, let’s look at exposure times for other celestial objects. The crab nebula (Figure 4) was taken at a 15 minute exposure (no stacking). The image only was contrast enhanced using PhotoShop. Notice that no field rotation is evident.